Showing posts with label foam. Show all posts

Friday, September 12, 2014

Epsilon Application

I've been working on a Diablo 3 Crusader costume for the upcoming BlizzCon, and today marked a big day for the build: I managed to get a layer of Epsilon coating onto the front side of my shield. Since this was my first time working with the material, I thought I'd share a few notes and pictures.


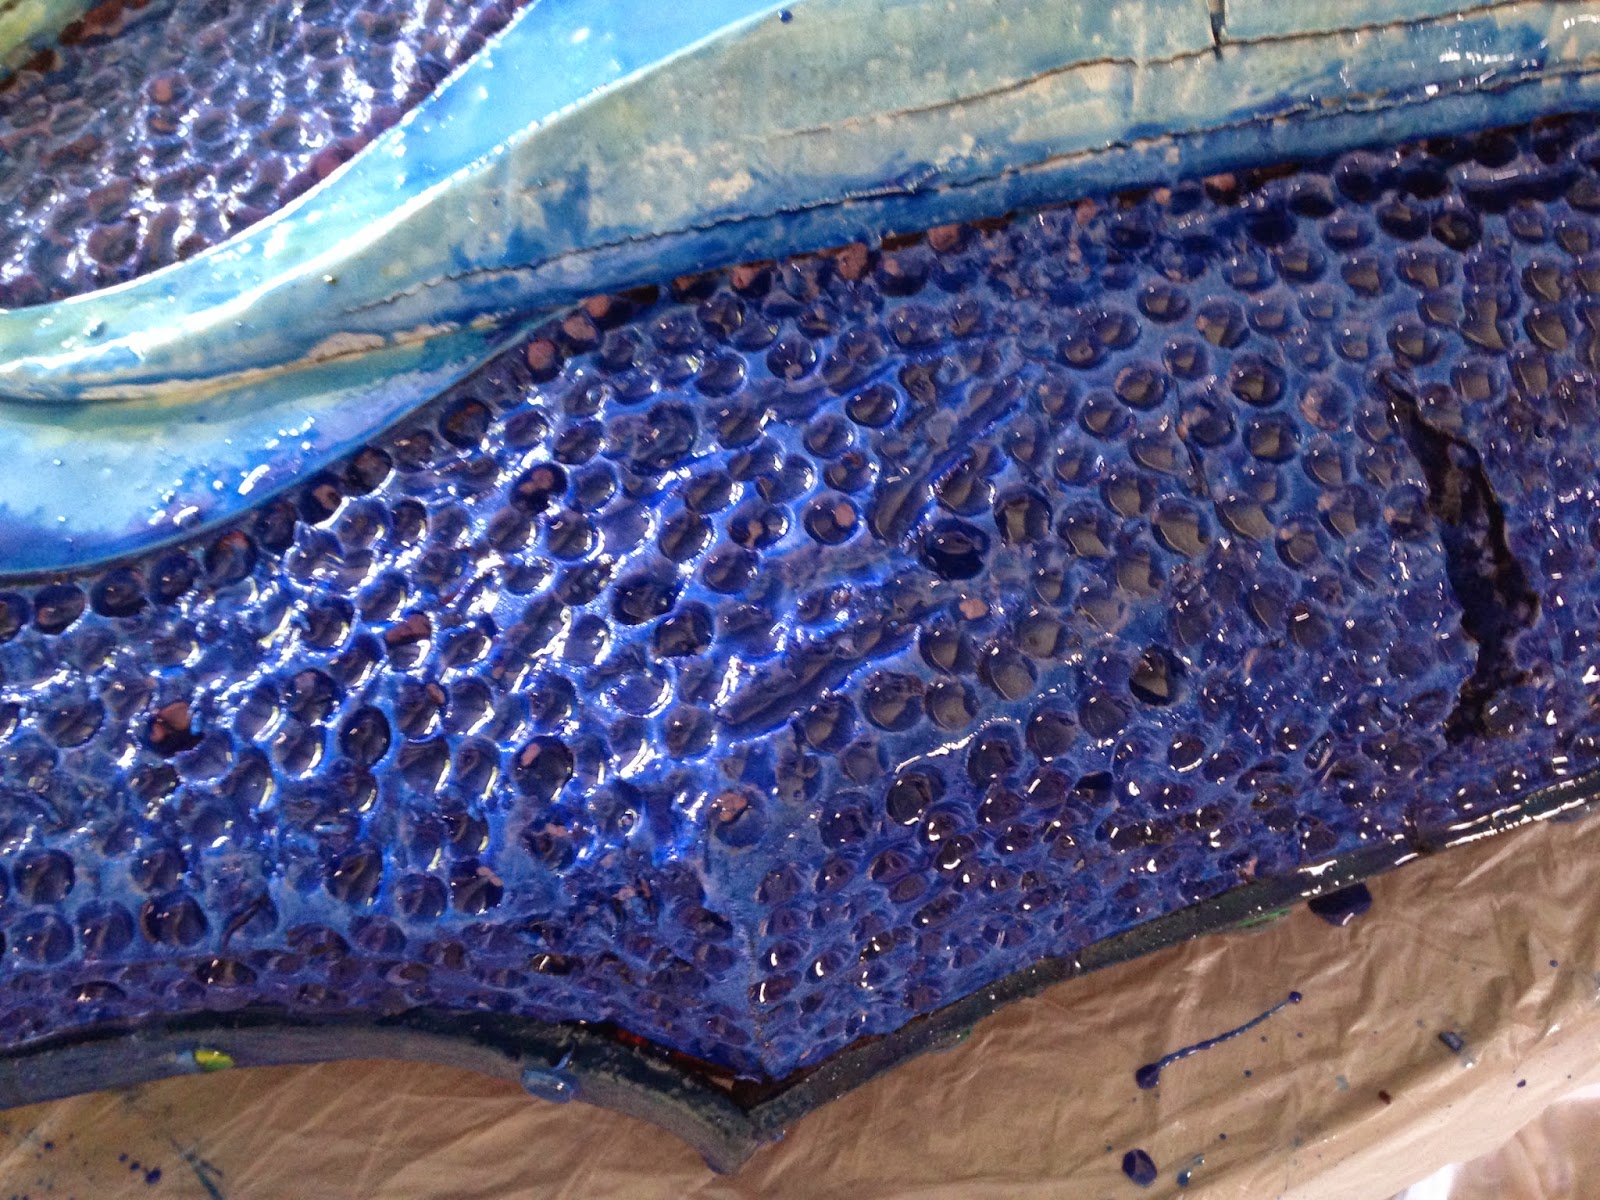
What you see above is a shield made of pink insulation foam and an EVA foam cross, which I've covered with Epsilon that was tinted blue for visibility. It took a couple hours to put on, and I worked in sections starting with the entire cross and then going around the body of the shield. 

Epsilon is a two-part epoxy coating by Smooth-On made for foam projects. It contains no solvents, so it won't dissolve foam on application. The end result is a piece that's easy to sand and paint, and has a hard plastic shell that protects it from impact. It's available online, but I happened to pick mine up at the Reynolds Advanced Materials in North Hollywood. 

The stuff mixes easily, but you have to work fairly quickly as it will start to gum up after 10 to 15 minutes. At one point I think I was too hasty in mixing, and the material went through a very noticeable exothermic reaction and cured into a useless glob. 

My shield is covered with divots intentionally, and it was tough to determine exactly how much Epsilon I would need to cover the surface area, but this application took up all of a trial-size pack. My coating is a bit uneven, and I'm sure I didn't make most efficient use of the material, but I think I still got the end look that I wanted. Once this side cures to a non-tacky state over the next two hours, I'll flip it over and do the much smoother back side.

All in all I think Epsilon is a cool material and I look forward to testing the hardness of the finished piece. With the glue-like consistency, I also liked how well it smoothed over unsightly gaps in the construction. I've seen some other people cover their EVA armor in this stuff and then be disappointed at the lack of flex afterwards; for me, the rigidity is a feature, not a bug.

I'll keep you all posted either on my cosplay Facebook page as to the final result!

What I'm Playing:

  • Main Campaign: P.T., Rogue Legacy
  • Side Quest: Shovel Knight


Sunday, September 8, 2013

EVA Heat Shaping Test

I've just cut some of the major pieces for an EVA foam armor project, and I wanted to get a feel for different methods for how to heat-shape the material. Here are my results:


The wavy piece was under a heat gun at high settings, and the round piece came from a 250*F oven after ten minutes. The oven piece seemed to warp a little on the corners from gravity, but for my project that might actually be an advantage. The oven piece gets even heat, and this bends very evenly. It comes out warm, but manageable even with bare hands; after some shaping, it cools quickly and gets quite rigid. I think both pieces are actually more rigid after heating; I wouldn't be surprised if this also shrinks them very slightly. I can see using the heat gun for fine points and touch-up, but I prefer the oven for large pieces. I wonder if the heat gun scorch marks could also be avoided by using a lower setting or trying for a more gradual, even heat. 

What I'm Playing:

-Main Campaign: Shin Megami Tensei IV
-Side Quest: 3DS Mii Plaza games

Monday, August 26, 2013

Cutting Some New Shapes

BlizzCon 2013 is coming up, and I'm preparing a costume that I've been wanting to do for some time. I don't want to reveal it yet, in case this whole thing falls apart, but I would like to put up some progress blogs.

Basically I'm making an EVA foam armor set, similar to the Mass Effect suits that can be seen on Punished Props. I downloaded the templates and the instructions for how to use them, and after much futzing around with Gimp and having no idea how to print them, I decided that the best part of the package was the example images and the instructions on how to take and modify your body measurements. Other than that, this is a custom job...


The first step was Molly helping me to trace my body outline on brown wrapping paper. I then plotted out my heigh and width measurements for my chest and back. I laid tracing paper over that and tried to do a decent freehand that came close to the example template...


I cut out that drawing and laid it over some sturdy cardboard and traced the outline. This is free hand, so instead of tracing it in full, I picked the better side and flipped it over to make it symmetrical. I cut out the cardboard with a razor knife (safety, kids!) That will be my template for cutting the EVA foam. I'm taking a break from the back piece to bang out this blog.

So far in the build process I've hit several fail points and redesigns, and its been valuable to remember that this is part of the process. I appreciate Adam Savage's advice to give yourself more time and supplies than you think you need, and expect to fail and waste materials. It's just part of the build. I'm also staying open to modifying tools and techniques to suit my build; after all, them end result is going to be more of a reference rather than a duplication of the source concept. Once it's done, I think I'll have enough call-outs to the source that it'll look really good. Keep an eye out for some updates after PAX Prime!

What I'm Playing
  • Main Campaign: Dragon's Crown
  • Side Quest: Divekick!, Animal Crossing New Leaf